Did you know that you can make a candle with just about anything? You can pretty much use any vessel. Today, I'm using vintage wooden salad bowls, I love these, because they’re similar to the popular dough bowls but for a fraction of the cost, and I love that they remind me of my mom and my sister from the 70's and that I found them at the thrift store for 10 cents each!
You don’t have to go thrifting though, you can also reuse old candle vessels, or little glass jars like Yoplait Oui yogurt containers or even a coffee or tea cup. I especially love “no spend or dual purpose” containers. Here are some of the things you’re going to need to make your very own candles:
You can find bags of Soy wax flakes on at your local craft stores and even on Amazon.
A common misconception about making your own candles from home is that once you melt the wax you’ve got to work really quickly to pour it- but I want to let you know that you don’t have to work that fast. I melted this wax and waited about 10 mins before pouring it, and it still worked out great!
First, you're going to need to clean your vessel, make sure it's free of dirt and dust and previous wax. Next, melt your wax in your double boiler, they recommend you pour your wax when candle wax is 136 degrees- I've tried both ways, I've tried it 136 degrees, I've tried it right off the double boiler when it's about 160 degrees... it's worked fine, all this to say- candle making at home is flexible. I generally, just eyeball it when I am making DIY Candles- but that’s just me. If you’d like to you can use a candle thermometer. When the wax is melted pour your fragrance right into the melted wax. You can use a metal stirrer or a wooden stick to mix in the scent. I don’t really measure, for those of you who like recipes, I suggest a few drops per oz, but it really depends on your preference. If you want a more mild smelling candle, use less, if you want to make a very fragrant candle, use more, but you wouldn't use more than one ounce of fragrance per one pound of wax. The scent always lessons when the wax is hardened. Okay, next you’re going to take some hot glue and glue the bottom of your wick, and secure it to the bottom of your vessel. Pro tip: Make sure your glue gun is nice and hot! If you don’t your glue won't hold when the wax is poured in and your wicks will float to the top.
Next, wrap your wick around your wooden skewer, and lay your skewer flat on your vessel.
Make sure your wick is nice and straight, before you pour the wax into the vessel. Pro Tip: If you are using wood wicks, you can use two skewers to sandwich the wick and hold it up straight.
Now it’s time to pour the wax. Grab your melted wax with your fragrance of choice mixed in and get ready to pour! It works best if you stand up and get right above your vessel. I love using this large metal pitcher to make sure you have an even pour.
Pro Tip: SLOW and steady- I recommend standing in one spot and slowly pouring the wax in until you are almost near the top. Pouring slowly helps you not get craters, divots, sinkholes. As the wax dries, it will shrink up a lot, so you want to pour it all the way to the very top! It's gonna sound crazy but when it cools, it shrinks. The biggest suggestion I can make when making candles at home is that once you pour it- you let it sit. DO NOT move it until it has hardened.
Now, don't move it and let it cool. Because if you start to move it around that's when you get craters or divots in your candle.
If your candle dries and there's a sinkhole -you don’t have to start over again! Some fill in it with wax, or you can do like the Pros do and use a heat gun like the one pictured down below. Pro Tip: Stay away from the wicks because a heat gun can catch the wicks on fire!
Now it's time for the final touches, after it’s fully cooled, you can cut the wicks shorter, tie with pretty bow and it's all set to go!
I love to make candles for the holidays. This is something that not even just the holidays, new neighbors, it's a great little gift to bring to someone. And you'd be surprised when you start making them just how inexpensive it is. So Maria, what do you do with the leftover wax? It’s unavoidable, you will have some leftover wax- I save it in tins or other vessels I'm not using, but whatever you do- do not pour it down the sink. If you want to watch me make this awesome candle step by step you can catch the whole video here on Facebook. Don't forget to share your very own DIY Soy candle creations with us on Facebook and Instagram! Can't wait to see what you'll make!
Hey Everyone!
This blog may contain Amazon Affiliate Links which means that I will receive a small commission on any purchases you make at absolutely no cost to you! The purpose of my blogs is to share some great budget friendly DIY's and to share all the tips and tricks that I know with my readers and the viewers of my videos. If you do make a purchase through any of my affiliate links Thank you so much for your support! Maria Reed, Moving With The Military.
3 Comments
Oh this is so good! Perfect on it's own or with a bowl of soup or dipped in cheese. Ok, I'm getting hungry now, what about you?
So why beer bread? The yeast in beer = instant bread. Beer bread is in the oven in about five minutes, and on your plate in under an hour. Super simple and easy. If you've never made bread before, this a great one to start with. It is believed that beer bread came from Egypt. There are drawings depicting the combination of bakeries and breweries together in their ancient art. Makes perfect sense right? We've taken that idea of the ages and elevated it with modern fall flavors to make your mouth water. It's a great addition to any Halloween event so grab your loaf pan, pumpkin pie spice and some measuring spoons and let's get cookin'!
Here's what you'll need to make your very own beer bread!
Hey Everyone!
This blog may contain Amazon Affiliate Links which means that I will receive a small commission on any purchases you make at absolutely no cost to you! The purpose of my blogs is to share some great budget friendly DIY's and to share all the tips and tricks that I know with my readers and the viewers of my videos. If you do make a purchase through any of my affiliate links Thank you so much for your support! Maria Reed, Moving With The Military. We’ve got HUGE news to share! Thanks to a new collaboration with Wayfair, some unique featured content is coming your way - AND amazing, high-quality highly rated home solutions are going to be provided to military families. YES!!!
It's been 3 years since the Moving with the Military team started this grass roots mission to serve and honor military families with home makeovers. As we’ve grown, we have been able to celebrate many families from all branches of the military by helping organize, remodel, renovate, and upgrade their homes with projects that transform their spaces and their lives. We’ve completed designs ranging from practical to innovative, industrial to bohemian, and minimalist to maximum style so we could meet the diverse needs of military families who give up so much while their service members provide and protect our country’s freedom. We reached out to Wayfair when we were just starting out and they encouraged us as we kept growing our vision and now we finally get the chance to partner with them and become Wayfair Homemakers!!! What does that mean? It means we have come together to broaden our brand’s audience and reach and inspire others with our design projects in our featured content. AND military families get amazing Wayfair products to make their housing feel like HOME. We can’t wait to begin. We will be launching video tutorials, blog posts, and awesome new content using Wayfair products. The exposure we will get through our featured content with Wayfair means we get to help more deserving military families, and share those great design tips with civilian families too. Now That’s How I Wayfair!!
We featured a fun "Quarantine Craft Time" back in April that we wanted to revisit since it was perfect for crafters of all ages and skill levels. It’s so fun and easy, and you can get the whole family involved, or just get crafty while you’re relaxing on your own.
All of the materials listed can be purchased and delivered to your house via Amazon, and the wood burning itself is fairly simple as long as you know how to trace. Kids can easily do this while supervised by an adult, and you can come up with all kinds of great things to display in your home from pictures, to quotes, to your favorite bible verse. First Steps for First-Timers The talented, Chandee Ulch, showed us everything we need to know about getting started, and It’s easy to get your hands on a wood burning kit- You can purchase just the wood pen and tips, or a full kit with stencils, stamps, and shading options for around $30. If you or your kids have done dot-to-dot's or have used tracing paper than this will be a breeze so don't feel overwhelmed. Try practicing on a piece of scrap wood if you'd like.
Step 4-
When you've transferred the design. It’s time to take the paper off and fill your design in with the hot tool. For simple fonts and line drawing, use the tip that looks like a pencil. However, you can play around with the different kinds of shading and learn just how crafty you really are. Just look at what Chandee was able to make with a lazy susan she already had at home. Isn't it beautiful!
Some things to keep in mind:
Show us what you made by sharing it with us on Facebook and Instagram! Let us know what your inspiration is behind your design too! I can't wait to see what amazing things you come up with! Did you miss the original video? Watch here and let's get crafty!
Hey Everyone!
This blog may contain Amazon Affiliate Links which means that I will receive a small commission on any purchases you make at absolutely no cost to you! The purpose of my blogs is to share some great budget friendly DIY's and to share all the tips and tricks that I know with my readers and the viewers of my videos. If you do make a purchase through any of my affiliate links Thank you so much for your support! Maria Reed, Moving With The Military.
So here's the thing. I love decorating a fireplace for all the holidays, especially during fall and winter. It's the perfect time to bring out all the festive home decor pieces. Wouldn't you know it since my husband has been in the Army we have not had a house with a fireplace. I finally said that's it, we need a home with a fireplace. No, we didn't move. Instead I built a faux fireplace that we can take with us wherever the military sends us.
Cut List:
1 - 1 x 12 @ 51" (bottom) 1 - 2 x 8 @ 51" (top) 1 - 1 x 12 @ 48" (front) 2 - 1 x 8 @ 39 3/4" (front of column) 4 - 1 x 4 @ 51" (sides of columns) 2 - 1 x 6 @ 51" (decorative front column) 2 - 1 x 4 @ 35" (for front plate decorative piece) 4 - 1 x 6 @ 3/4" (bottom column sides) 2 - 1 x 6 @ 7" (bottom column front)
Here is the step-by-step video on how to make your own faux fireplace.
Here is my finished faux fireplace all decorated for fall.
I just love how cozy it looks!
Isn't it beautiful!
How did you make your faux fireplace? Share a picture or even a short video with us over on Facebook or Instagram!
Hey Everyone!
This blog may contain Amazon Affiliate Links which means that I will receive a small commission on any purchases you make at absolutely no cost to you! The purpose of my blogs is to share some great budget friendly DIY's and to share all the tips and tricks that I know with my readers and the viewers of my videos. If you do make a purchase through any of my affiliate links Thank you so much for your support! Maria Reed, Moving With The Military.
You asked for it, we’re giving it to you!
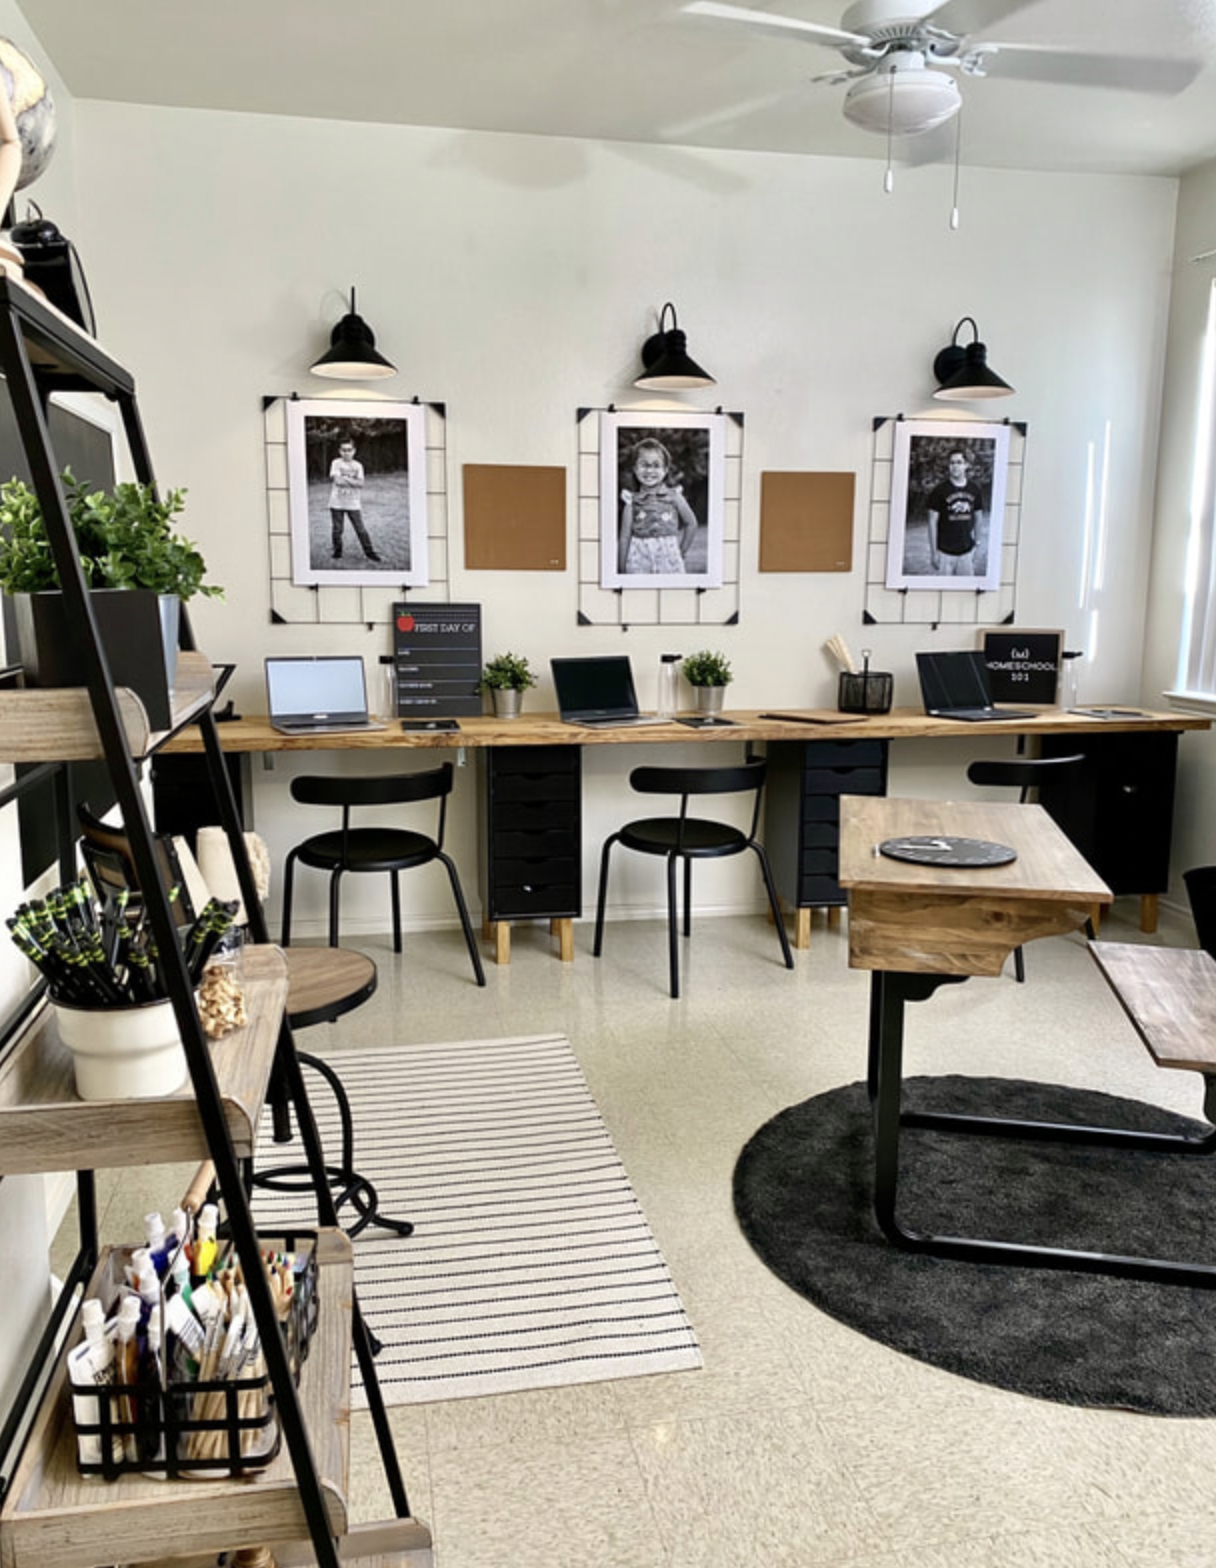
When an Army family needed a homeschooling classroom remodel, we were there to help get it into shape. We set them up for learning success with a high contrast design that made the space both visually appealing and functional. We received a huge response from our viewers looking for details on where to get their hands on the materials we used in our design. So we’re going to give them to you here! You can recreate this space, or use these ideas as inspiration for a design that meets the needs of your home and family. The perfect work space: Starting with the 3-person workstation, including cabinets and lumber for a wall length desk that gives everybody their own space to get their work done. This worked great in the homeschool space, but you could consider something similar for a shared home-office space as well.
We used these black 6-drawer file cabinets for the workstation bases with 4 wooden legs for each file cabinet.
The table top for the work station was made using 2x10x12 lumber we picked locally at HomeBase and could be found at Home Depot or Lowes depending on your location. We then stained it with Minwax Stain in the Provincial finish.
That fun personalized hanging file folder system in grey felt came from Target but you can find a similar hanging wall file organizer and Scrabble Tiles on Amazon to add your own fun personalized touches!
Adding homeyness to that high-contrast design.
It’s vital to help make military housing feel like home. We always add details to make sure the redesigned space suits your practical needs, and presents the comfort your family is looking for. We got our 4-tiered bookshelf to store knick-knacks and stylized decor from At Home, and that cozy round gray rug can be found at Ikea!
We loved working on this project!
If you missed it you can watch it below or over on our Facebook page.
Tune in every month for a new Moving with the Military Home Makeover episode!
Head over to our Facebook and Instagram pages and tell us what you think of our homeschool classroom makeover!
Hey Everyone!
This blog may contain Amazon Affiliate Links which means that I will receive a small commission on any purchases you make at absolutely no cost to you! The purpose of my blogs is to share some great budget friendly DIY's and to share all the tips and tricks that I know with my readers and the viewers of my videos. If you do make a purchase through any of my affiliate links Thank you so much for your support! Maria Reed, Moving With The Military.
Lemonade Day is a fun, experiential program that teaches kids how to start, own and operate their very own business - a lemonade stand.
Kids have the opportunity to experience entrepreneurship by setting up their business during their city's community-wide Lemonade Day. Check out their Lemonade Day website for participating cities. One thing we've learned about having a business is that you need to get creative with what you offer your customers. Here is a super fun Lemonade Day recipe, white chocolate lemon cake with crushed Lemonhead candies.
If you would like to see a step by step video you can watch it below or find it over on our Facebook page.
Have you made this delicious white chocolate lemon cake?
Share a picture and tell us what you thought of it on our Facebook and Instagram!
Hey Everyone!
This blog may contain Amazon Affiliate Links which means that I will receive a small commission on any purchases you make at absolutely no cost to you! The purpose of my blogs is to share some great budget friendly DIY's and to share all the tips and tricks that I know with my readers and the viewers of my videos. If you do make a purchase through any of my affiliate links Thank you so much for your support! Maria Reed, Moving With The Military.
While you’re staying home during this time of social distancing it’s a perfect time to do all that Spring Cleaning you’ve been thinking about. But don’t stress it. Take it one room at a time, one task at time.
Today we’re working on baseboards. With cleaning supplies a little scarce, we’ve made a couple DIY Reusable Cleaning Wipe recipes.
Hey Everyone!
This blog may contain Amazon Affiliate Links which means that I will receive a small commission on any purchases you make at absolutely no cost to you! The purpose of my blogs is to share some great budget friendly DIY's and to share all the tips and tricks that I know with my readers and the viewers of my videos. If you do make a purchase through any of my affiliate links Thank you so much for your support! Maria Reed, Moving With The Military.
Have you ever wondered how planes fly in the air? They are so big. For real.
Science Behind Flight Aviation the flying or operating of aircrafts. Aeronautics is the science behind flight. There are four forces that help an airplane fly. The four forces are lift, thrust, drag, and weight or gravity. Thrust is generated by the engines of the aircraft. Our thrust is going to our forward launch throwing the paper airplane. Lift is the force that directly opposes the weight of an airplane and holds the airplane in the air. Lift is generated by every part of the airplane, but most of the lift on a normal airliner is generated by the wings. Gravity is the force that will be pulling a paper airplane to the ground.
Drag is the aerodynamic force that opposes an aircraft's motion through the air.
Day 3 Arts and Crafts with your kiddos. We are making super cute corner bookmarks, toilet paper roll binoculars and popsicle stick puppets.
These are easy to make
|
AuthorMaria Reed Archives
March 2021
Categories |