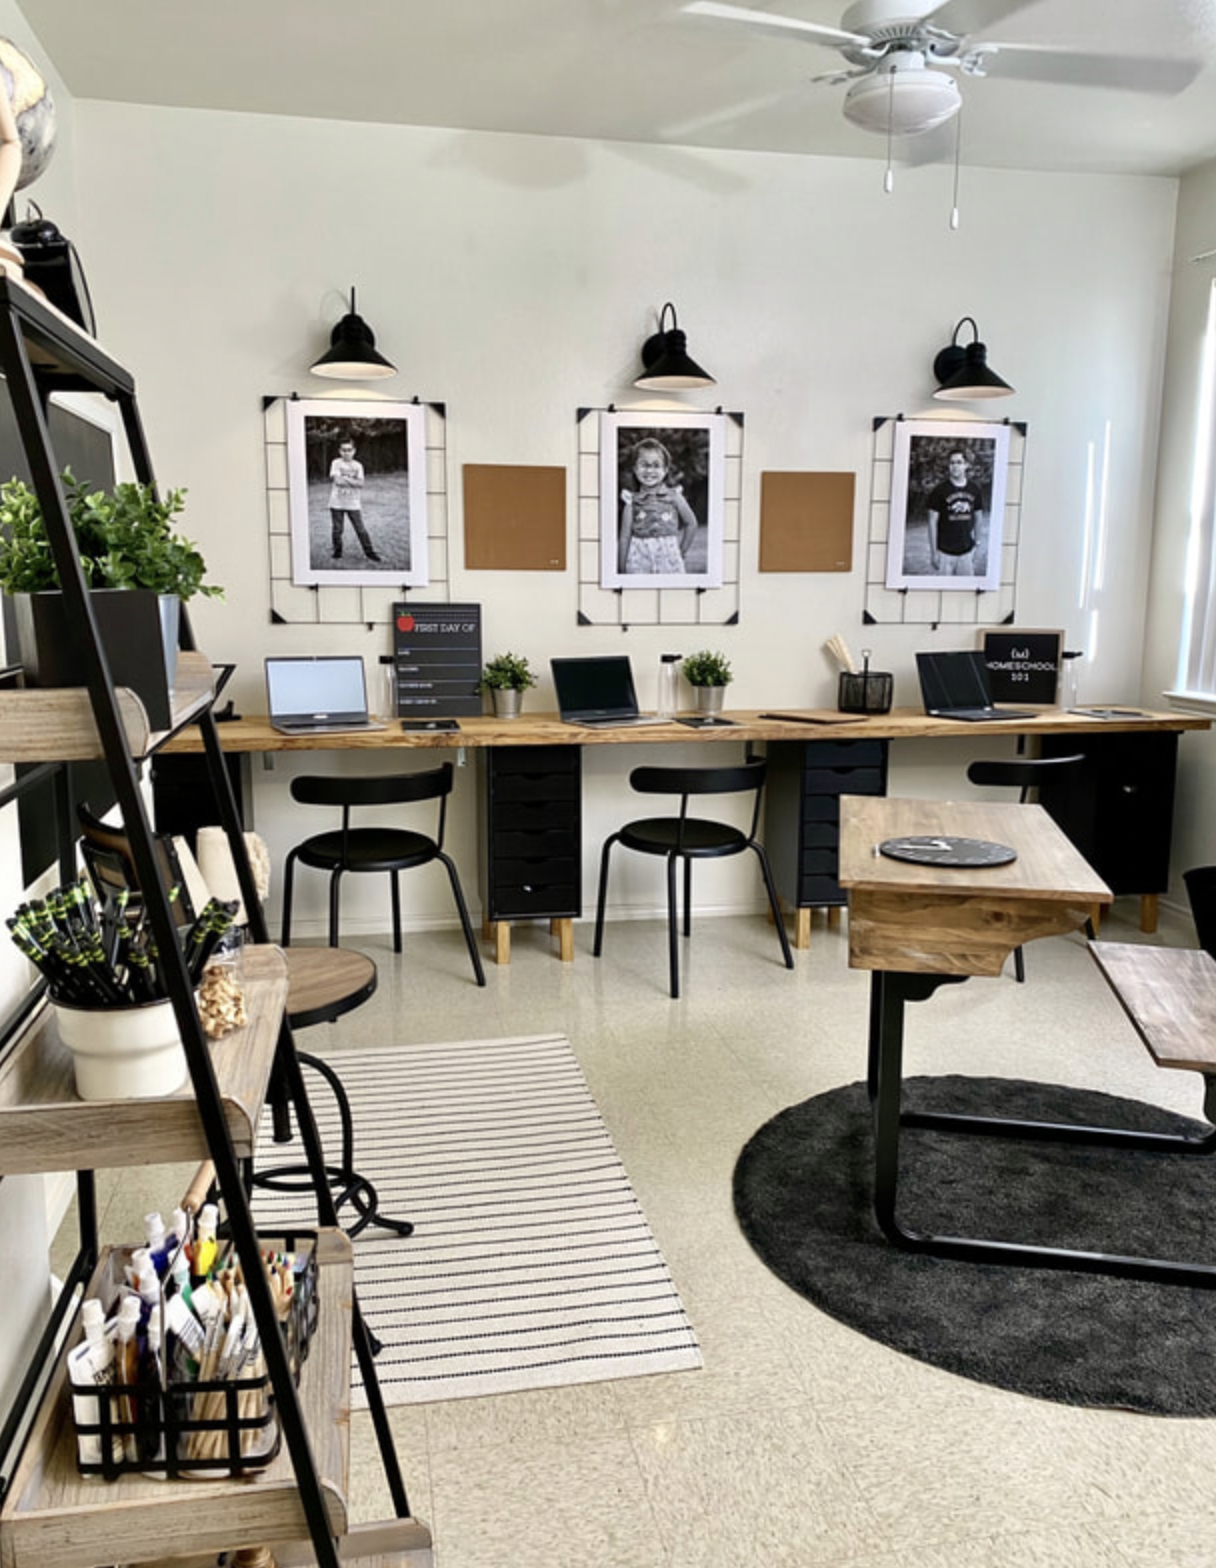
In this episode of Moving with the Military, we have the opportunity to help military spouse Julie Moser with an innovative Home Office Makeover. Julie is the founder of 2020 Top-rated non profit Pink Warrior Angels. She’s a survivor herself, and was recently re-diagnosed with breast cancer. The first time she was diagnosed with breast cancer she found out while her husband was deployed overseas. If you thought that would slow her down, you don’t know Julie. Military spouses have to be resilient. Between constant flexibility and preparation for PCS season, creating bonds with people and places they adore, only to be bounced to another state or country soon after, and having family members leave to faraway and sometimes dangerous locations-- All while keeping routines, schedules, and family life rolling smoothly, it’s not for the faint of heart. Then you take milspouses like Julie. She has the right combination of strength, soul, and smarts to also run an organization that helps breast cancer survivors- Pink Warrior Angels- and now it's our turn to help her. With all the plates she has spinning in the air. Julie’s space started to take on the physical representation of the load she carries. For somebody like Julie, who is always on the move and has that peak creative energy flowing, it can be hard to slow down and make sure the piles aren’t growing as she moves from task to task. When the clutter started to become overwhelming, we knew we could help her clear the space and make it the organized, productive space she deserves. We wanted to give her a home office that was multi-functional and could help her achieve and engage in several tasks at once with ease and strategy. We also wanted a place that would inspire her and motivate her to tap into her gifts so she can share them with others. When you get an organizational system in place, it makes it effortless to manage your space because you aren’t just putting the clutter “away”, there is a structure in place to make the flow of your day-to day-go smoothly. Even some of the most organized people will have messes to handle occasionally. Y’all should see my dining room after a craft DIY!! So instead of having open shelving in this center of operations, it made sense to create these eye-catching cabinets to make space for the mess, and help clear the path to productivity, efficiency,and creativity. We brought in professional organizer, Melanie, from Organizing with Intention and headed to Ikea to create some useful and inexpensive systems to put in place.
If you'd like to see the full video for this workspace transformation you can see the video here on Moving With The Military's YouTube Channel! Head on over and subscribe to our channel so you never miss an update from us! Let us know what you thought of this beautiful makeover on our Facebook or Instagram. Don’t forget to follow Moving With The Military on TikTok too! Lot’s of fun things happening over there so head over and check it all out!
0 Comments
I have a really cool DIY that I want to share with you for Maker Monday, concrete candles! They are really cool and fun to make and I'm going to walk you through how to make them. So if you're not following us on Instagram or on TikTok, I encourage you to follow us over there as well. We like to put different content on all the different platforms, so you're not going to want to miss anything!
Here’s how to make Concrete Candles with Gold Leaf accents:
I hope you liked this Maker Monday craft project! If you’d like to see me make this candle step-by-step you can find the video here on Moving With The Military’s Facebook page.
Share your candles with us on Facebook or Instagram. Don’t forget to follow Moving With The Military on TikTok too! Lot’s of fun things happening over there so head over and check it all out!
Hey Everyone!
This blog may contain Amazon Affiliate Links which means that I will receive a small commission on any purchases you make at absolutely no cost to you! The purpose of my blogs is to share some great budget friendly DIY's and to share all the tips and tricks that I know with my readers and the viewers of my videos. If you do make a purchase through any of my affiliate links Thank you so much for your support! Maria Reed, Moving With The Military.
You know how you get cute T-shirts or graphic tees with a unit or squadron name on it or maybe you just love the design of a shirt that you bought but it's a unisex tee and it's not super flattering for your body type.
I want to show you guys a quick 'No-Sew' way to make a cute workout or athleisure tank that you can wear to work out in, go on walks or just do stuff around the house. This is also a good way to finally wear those shirts that have been hanging in your closet getting passed up because it doesn't quite fit right. In just a few short steps you can have yourself a new favorite tank top! Here's how: Step 1: Use a tank top that fits you well to use as your template shirt. Step 2: Grab a shirt that you want to transform. Maybe it's a t-shirt that you don't find very flattering but you love the graphic on it or maybe it's a shirt that you have had sitting around that you want to wear more often. Lay it as flat as you can and then fold it hotdog style in half. Step 3: Make sure all the seams are lined up and are as symmetrical as you can get them.
Step 4: Lay your template tank top on top, and fold it hotdog style in half. Make sure all the seams are lined up as much as possible.
Step 5: Using a Sharpie pen or a piece of chalk, trace the outline of the template tank top onto the old shirt. This will be the line that you cut. At the bottom leave about 2 inches and mark a straight line across. You can always cut it shorter if you need to. This part always tends to roll up a bit if it's a knit tee.
And that's it! You have made yourself a tank top from an old t-shirt!
Now you have a cute workout tank that you can wear on your walks and that you can even work out in if you want to. It will be perfect for running or riding bike and perfect with a contrasting colored sports bra too!
If you want to you can take a needle and thread and put a couple of little stitches on the arm seams to keep them from fraying but they really shouldn't fray too much. I hope you liked this Maker Monday No-Sew t-shirt remake! This is a super cute and super helpful way to transform that old unworn t-shirt into something you can wear and enjoy all over again and give it new life! If you'd like to watch the full video for a step-by-step demonstration from Kim you can find the video on Moving With The Military's Instagram. If you tried it please share your new tank top design with us on our Facebook or Instagram.
Hey Everyone!
This blog may contain Amazon Affiliate Links which means that I will receive a small commission on any purchases you make at absolutely no cost to you! The purpose of my blogs is to share some great budget friendly DIY's and to share all the tips and tricks that I know with my readers and the viewers of my videos. If you do make a purchase through any of my affiliate links Thank you so much for your support! Maria Reed, Moving With The Military. Yes, Really! I’m dead serious!
TikTok is a total game changer. If you aren’t on it yet, hopefully after you read this post, I’ll have convinced you to jump on board the TikTok train, and start adding real value to your life in fun, bite sized pieces. If you ARE already on TikTok and loving it, make sure you’re following us on TikTok ,@movingwiththemilitary, and also share your fave accounts to follow with the Moving with the Military community. Trusting the O.G. TikTok Expert- My Kid! When I first discovered the TikTok universe, I honestly thought it was a bunch of teenagers dancing and doing silly challenges. I think there are a lot of people like me out there who incorrectly assume that TikTok is not for them. It didn’t take me long to find out it’s literally for EVERYBODY!! My TikTok guru was my teenage daughter, Parker, who enlightened me to all that TikTok has to offer. She had been on the app for a while and was finding high interest, bite sized, easily consumable information about everything from feminine health, to awesome recipes, to amazing fashion finds. It was super useful for her, and I eventually decided to check it out. I never looked back. When I tell you TikTok offers value, I mean you can find ways to learn more about almost ANYTHING on this platform. And the accounts you follow will trigger more similar kinds of accounts to follow so you can find awesome life hacks, and all kinds of experts sharing their secret sauce in seconds- so it’s designed to hold your attention and be super accessible. TikTok With Us! Moving with the Military is on TikTok with our hacks and DIYs showcasing everything from whole room makeovers to individual crafts to zhuzh up your space, create great gifts and pieces for your home, and find fun ways to repurpose inexpensive finds for your own space. TikTok is a place where you can find content with hacks, tips, and how-to’s for almost anything like:
Are you in yet? If you’re still not sold, give me ten minutes. Load the TikTok app on your phone and follow @movingwiththemilitary. Watch a couple of our DIY's or Home Hack videos, and see what other accounts are suggested for you. Don’t forget to like and comment on our videos and let us know what you think, and tell us what kinds of videos we should make next! Also, Help us reach 100K followers on TikTok and we’ll GIVE AWAY a complete Room Makeover!
Hey guys, it's Maker Monday! Today We are going to be making the cutest Rainbow sugar cookies ever with Miss Mary Garcia!
Mary Garcia, also known as the Goodie Godmother, is a military spouse of 15 years, both married and active duty. Her husband is Air Force soon to be Spaceforce. Mary started Goodie Godmother in response to needing something that was flexible, and moved with them, but also combined her love of cooking and her interest in photography. She believes that food is a great way to foster community and that it brings people together. No matter who you are, you can sit down with someone over something as simple as a cup of tea or coffee, or a meal and you can find something in common. Food is that great connector that brings us all together. Today we are going to turn plain sugar cookies into Beautiful Rainbow Cookies using buttercream frosting and some decorating sugars or cake sparkles. You can use whatever sprinkles you want. I like the sanding sugars because I can make my own colors to match whatever theme I want. If you can not find a specific color you can buy white sanding sugar and add liquid food coloring or even gel food coloring to get the colors you would like. You can use liquid, gel or even powdered food coloring. Just mix it up really well until the sugar is coated and then let it sit until it's dry. This is a really neat trick if you ever host a baby shower or a birthday party and you want a quick cupcake topper. We are using Buttercream frosting as opposed to Royal icing. Royal icing, depending on your consistency, will spread and would require you to wait in between each layer. For this cookie Buttercream frosting is much easier and we can go layer to layer without the wait. The great thing about this particular project is that it's so accessible even if you're not a baker or If you're baking with kids around and you want this to be a fun at home project for the kids. There are so many ways to adjust the project so that it's either as involved or as simple as you want it to be. I think baking should be fun and it should be accessible to everyone and you can adapt it to your season of life at the time. This is my stay soft sugar cookie recipe. It's a nice soft sugar cookie that holds its shape really well. Cut in half straight out of the oven too with these nice beautiful edges. You can always buy rolled sugar cookie dough at the grocery store and just cut it in a circle. Then cut the circle in half too.
Start from the outside one line at a time. Pipe a line of frosting and release the pressure before you lift your bag at the end and then slide your bag off to avoid getting a big glob on the ends. It does not have to look perfect for this particular project because it is going to be coated in sprinkles. Use a mat or paper plate or something if you want to have easy cleanup for this because the sprinkles do get a little bit messy.
Using your cake sparkles or sanding sugars coat the line in sprinkles with your choice of color. Be sure to get them on the inside curve of your frosting and then tap off the excess sprinkles and repeat this for all the colors. You can adjust the thickness of the lines and you don't have to wait at all between lines because the buttercream does not change its shape. Now for the finishing touch! Using your piping bag straight up and down pipe a dot of frosting down near the ends of the rainbows to make some clouds. Lightly push down while squeezing out the frosting and swirl your piping bag to make the little clouds.
You can use this decorating technique for St. Patrick’s Day, Fourth of July, Birthdays, baby showers etc. Just change up the colors and you’re all set!
This also makes a great activity for the kids to do while you get some great family pictures! You can find Mary’s Soft Sugar Cookie dough recipe here along with some of her other delicious recipes on her Goodie Godmother site. Mary is also in the middle of putting the finishing touches on a Royal Icing Cookie class for beginners. It will help you understand how to mix the right consistencies of royal icing and a couple of other basic techniques as well. Keep an eye on the Classes tab on her site for this upcoming class so you can make pretty sugar cookies too! I would love to see your cookie creations! Share a picture with us on our Facebook or Instagram!
Hey Everyone!
This blog may contain Amazon Affiliate Links which means that I will receive a small commission on any purchases you make at absolutely no cost to you! The purpose of my blogs is to share some great budget friendly DIY's and to share all the tips and tricks that I know with my readers and the viewers of my videos. If you do make a purchase through any of my affiliate links Thank you so much for your support! Maria Reed, Moving With The Military. In our newest episode of Moving with the Military we got a chance to serve a retired Purple Heart recipient-turned-first-responder with a dream bedroom makeover. This is one of our favorite makeovers yet! We had a beautiful blank canvas to make their bedroom a tranquil place to relax and enjoy the comforts of home for years to come. Everybody deserves a bedroom that feels like a refuge. Especially Jose and Sarah - a couple who has spent the last 2 decades serving others first. With the help of Caliber Home Loans, we jumped at the chance to serve this family, and fill their room with colors and textures that radiate calm and peace. Jose and Sarah loved the texture and design features of their new room and I am thrilled to share how you can take inspiration from this room to create the look on your own. A Bright Blank Canvas Ready for a Fresh Design When Jose retired from the army, they moved into their forever home, and they love it. But they never got around to designing that perfect bedroom oasis of their dreams. That left our Moving with the Military team with a bright, beautiful blank canvas to let our creative juices flow, and design the room they deserve. We gave them a gorgeous vivid blue bed frame from Wayfair as the focal point, and played with blues and greens with a pop of coral throughout the room. We found a modern, white, textured nightstand with gold frame that added dimension to the room. We put other modern gold touches in the small details, and played up fun textures and patterns to create a space they would love to come home to. One of my favorite additions was the animal print lamp base that added the right amount of character to the space. Bringing together Individual His and Hers Design I loved the reading nook 'she-space' we created for Sarah to relax in the warm sunshine, and take in the calm and comfy vibes. Because it's such a bright room, we got to play a lot with color and texture and design, and still have a soft, airy feel. From the softly patterned rug, to the throw pillows and ottomans, to the curtain ties, we created an eye-catching space. We added faux plants throughout that give that vibe we want, with zero maintenance. Military families have to keep weight allowances in mind when picking out their pieces, but because Jose is retired, he can have some heavy pieces that really make a statement. One of my all time favorite pieces is this mid-century modern 6 drawer double dresser from Wayfair. It came in a rich dark wood lending a little bit of a masculine touch to the room. How to Create This Look at Home:
For this family, we embraced a mid-century modern look and added texture pattern and color that spoke to this family’s style. You can start with our Wayfair pieces and a monochromatic palette. Then pull in your favorite colors, and experiment with textures to add a pop of personality and style to your space. We’d love to know if this space inspires you as much as it did us when we designed it. Make sure you like and follow us on Facebook and Instagram. Make sure to comment on our post to ask questions and share your design ideas, and stay tuned for our next episode of Moving with the Military. Lisa Medina is an army wife, with four children, 19 years of marriage and 10 military moves. She has lots of experiences with taking a space, whether it's on post or off post, or whatever the case may be in creating a cozy home that she can enjoy and love and feel like it truly is her own no matter where the military sends them. She recognizes that joy can be found in the small things, and uses her DIY skills to make her home a welcoming place for both her family and all who walk through the door. Fueled by Jesus and coffee, Lisa loves to share her creative ideas and passion for life on her blog, Wildfire Breaking Free, and on Instagram.
This DIY is literally so simple that anybody can make it probably less than five minutes, maybe even two minutes. It's one of those practical DIY's that I think that anyone can use, especially if you love plants! It's also one of those things that no matter where you go, if your ceilings are higher or lower you can extend or shorten this and it's going to keep going with you move after move. If you have macrame plant hangers that are too short for your space and you want to make them longer to better fit your space then this DIY is for you! Here’s what you’ll need:
Depending on your current decor or style you can paint or stain the wooden beads in a color that matches your style. You can do whatever you’d like to add the flair that you want to fit your space. You can also use different colors of wire as well depending on your space and style. Remember to find a stud in the ceiling if you are hanging a larger heavier plant from the ceiling hook. Here's how to make the beaded plant hangers:
And just like that it’s all done! Wasn’t that super easy? Think of all the possibilities you have with painting and staining the beads and using different colored wire as well. You can make these longer or shorter depending on the space that you are hanging your plants in. If you would like to watch a step by step video on how to make your own plant hanger you can see the video over on Lisa's blog and on Moving With The Military's Facebook page. Lisa has linked all the items that you will need in her blog so it's one stop shop to get started on your very own DIY plant hanger! You can join Moving With The Military LIVE on Monday's at 10:30 AM CST on Facebook for Maker Monday's! |
AuthorMaria Reed Archives
March 2021
Categories |